Challah Bake Event: 5 Easy Steps for Delicious Braided Bread!
Ready for a challah bake event? Discover how to create delightful homemade challah with our easy recipe. Get baking tips and share the joy!

- "Festive Challah: A Celebration of Flavor and Tradition"
- Premium Ingredients Guide
- Kitchen Equipment Essentials
- Festive Challah: A Celebration of Flavor and Tradition
- Success Guaranteed Tips
- Perfect Presentation
- Storage and Make-Ahead
- Creative Variations
- Complete Nutrition Guide
- Expert FAQ Solutions
- Recipe Card
"Festive Challah: A Celebration of Flavor and Tradition"
Have you ever tasted a loaf of bread that felt like a warm hug from your grandmother? seriously, what is it about fresh bread that just makes everything better? i mean, if i’m ever having a rough day, you can find me in the kitchen, messily flouring my countertop, armed with only my best apron and a dream of braided perfection.
Now, if you’re wondering what makes challah a unique treasure among breads, let me tell you—it’s the glorious blend of sweet and savory flavors, the ritual of brhelping , and the rich history behind each loaf.
Getting into the nitty-gritty, this challah bread recipe is a delightful project that’ll whisk you away into a world of baking memories .
The total time you'll need? about 1 hour and 45 minutes. the difficulty level is around medium. sure, there are a few steps involving dough rising and the feared yet exciting task of challah brhelping , but with a sprinkle of patience and a splash of ensoiasm, you’ll have nonna-quality jewish bread right in your kitchen.
The Heart of Challah
The historical background of challah is pretty fascinating. originating from the ancient jewish tradition, this braided bread has graced the tables of countless shabbat meals and holiday celebrations, where it’s often blessed before being shared.
But what really sets challah apart is not just its stunning appearance when it’s freshly baked, but also its role in connecting families and communities.
There's an entire culture wrapped up in this beauty!
For starters, it boasts that rich culinary heritage —it’s baked with love and served in unity. making challah isn't just about the end product; it’s about the experience of coming together.
Ever been to a challah bake event ? it’s a joyous occasion where people gather, bond over their flour-covered hands, and create something magical.
In modern times, this bread has gained popularity well beyond jewish homes. you’ll see variations popping up in bakeries worldwide.
From traditional sweet recipes to trendy savory options , oh my gosh, the flavors are endless! from honey-drizzled loaves to those studded with dried fruits, it’s like each bite transports you to a warm family gathering.
Your New Favorite Challah
Now, if you’re imagining a loopy, grapevine-like braid, or even a simple single twist of dough, let me tell you: it’s easier than it looks! with a couple of tricks i learned (thanks to numerous messy baking afternoons ), like the right egg wash for that shiny crust and foolproof bread rising techniques , you’ll give those bakery loaves a run for their money.
And guess what? this recipe is designed for everyone—whether you're a seasoned pro or a total beginner. plus, if you’re looking to spice it up, there are so many flavor combinations to explore.
Think of adding spices, nuts, or even chocolate chips! it’s like your taste buds get to go on a little vacation with each variation.
Health and Nutrition Highlights
Now, while we’re basking in the warmth of homemade bread, let’s chat about the health benefits for a sec. challah, featuring ingredients like egg wash and honey, isn’t just yummy ; it’s got some nutritional perks too.
Eggs help pack in protein, while honey adds a touch of natural sweetness. just keep in mind your dietary preferences; you can swap ingredients with ease.
Recipe at a Glance
So, here's a neat snapshot of what you’re diving into:
- Total Preparation Time: About 1 hour and 45 minutes
- Skill Level Required: Medium
- Serving Size: About 16 slices, yielding 2 large loaves
- Cost Efficiency: Totally budget-friendly—trust me, your wallet will thank you!
As you step into your own baking adventure or maybe even join a challah bake class , you'll find yourself immersed in a world that blends tradition with modern baking fun .
And soon enough, you’ll be gathering your family in the kitchen, mixing dough, and sharing stories as you await that gorgeous loaf to rise.
Next up, let’s gather our ingredients and get this party started! You won’t want to miss the magic of combining all those wonderful flavors and techniques. Grab your apron, and let’s roll!
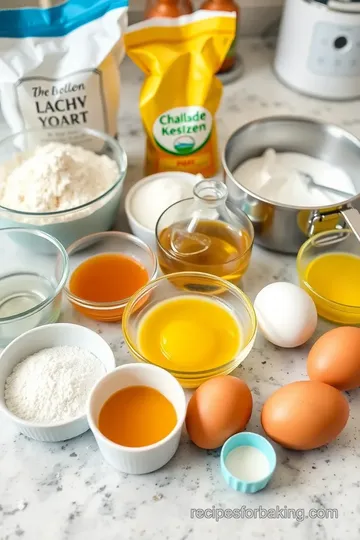
Premium Ingredients Guide
Alright, my love for baking has led me on this journey of discovery in the kitchen, especially when it comes to a cherished staple: challah bread .
This braided bread is not just a feast for the eyes; it's steeped in tradition and flavor, perfect for any baking event or shabbat meal.
So, let’s dive into the nitty-gritty of choosing the best ingredients to ensure your homemade challah turns out brilliantly!
Premium Core Ingredients
When you’re crafting your Challah , the foundation is your ingredients. Here’s what you need to know:
-
Detailed measurements : for a beautiful braided bread , precision is key! for our recipe, you’ll need 4 cups of all-purpose flour, 1/4 cup of sugar, 2 large eggs, and a packet of active dry yeast .
Measuring correctly ensures the right dough consistency.
-
Quality Indicators : Always look for flour that’s finely milled. The freshness of your yeast is also crucial—if it’s expired, you’ll end up with a flat loaf that’ll make you weep!
-
Selection tips : when it comes to eggs, go for the freshest ones you can find. i’ve found that local farm eggs have the best flavor and rich yolk color—perfect for that shiny egg wash for bread .
-
Storage Guidance : Store your all-purpose flour in an airtight container in a cool, dry place. Keep your yeast in the fridge or freezer to extend its life.
Signature Seasoning Blend
Now, let’s sprinkle in some flavor!
-
Spice combinations : while classic challah is sweet, i like to play around with flavors. a pinch of cinnamon can change up your traditional recipe, especially if you’re baking for holiday events .
-
Herb Selections : If you lean towards the savory side, consider adding fresh herbs like thyme into the dough for a delightful twist. It’s perfect for serving alongside soups.
-
Flavor Enhancers : Honey is typically used in Challah for sweetness, but consider adding a hint of vanilla extract to elevate the flavor.
-
Aromatic Additions : A dash of nutmeg can make your bread feel like a warm hug on a chilly day!
Smart Substitutions
Life happens, folks! So here’s how to keep your Challah recipe on track if you’re missing something:
-
Alternative Options : Forget honey? No biggie! You can swap in agave nectar or pure maple syrup.
-
Dietary Swaps : If you need a vegan option, replace eggs with flax eggs. Just mix one tablespoon of ground flaxseed with 2.5 tablespoons of water for each egg.
-
Emergency Replacements : No active dry yeast? Instant yeast works just as well, and it’s usually on hand.
-
Seasonal Variations : Fruits can be seasonal, but dried fruits like apricots or cranberries add that sweet pop pretty much year-round!
Kitchen Equipment Essentials
Let’s talk shop—what tools do you need for baking your homemade Challah ?
-
Must-Have Tools : I can't recommend a good mixing bowl enough. A solid wooden spoon or dough scraper is essential for mixing and kneading.
-
Recommended Appliances : If you love baking, invest in a stand mixer with a dough hook—it's a game changer for bread-making techniques !
-
Helpful Gadgets : I swear by a pastry brush for that beautiful egg wash. And don’t forget parchment paper; it saves you from sticky baking sheets.
-
Home Alternatives : No kitchen scale? Just use measuring cups! Just remember to level off the flour.
Pro Ingredient Tips
Here’s where I spill the secrets:
-
Selection Secrets : When choosing flour, look for a high-protein content for better gluten development. It’ll make your Challah rise beautifully!
-
Quality Markers : Always check your yeast; if it’s not bubbly and frothy after activation, toss it out.
-
Storage Solutions : Keep your honey in a dark location to maintain its sweetness and consistency.
-
Money-Saving Tips : Buy your ingredients in bulk! It often saves money and ensures you always have what you need on hand.
So now that you’ve stocked up on premium ingredients and essential tools, are you ready to bring your Challah story and significance to life? Grab that mixing bowl because we’re diving into the delightful instructions next!
Festive Challah: A Celebration of Flavor and Tradition
Alright, gather ‘round, friends! today, we’re diving into the delightful world of challah bread—a beautiful, braided treat that has graced many tables during shabbat meals and special occasions in jewish culture.
Honestly, nothing feels quite as hearty and celebratory as the fragrant aroma of baking bread wafting through the house. whether you're preparing for a challah bake event , or simply want to add a unique twist to your family meals, this is the recipe for you.
Grab your aprons because we’re about to create something magical!
Essential Preparation Steps
First things first: let's talk mise en place . this fancy french term just means getting everything ready beforehand. for this sweet bread recipe, you’ll want to measure out your bread ingredients —like the flour, sugar, and honey—before you start.
It makes the whole process feel less chaotic.
Next up, prep techniques ! start by activating your yeast in warm water, around 110°f (43°c). don’t rush this; let it sit for 5-10 minutes until it becomes foamy.
It’s like giving your bread a little pep talk; the yeast thrives on this!
Now onto time management . you’ve got about an hour of rising time (so maybe catch up on netflix while you wait?) but be sure to get your brhelping technique down in that time.
A well-organized baker is a happy baker, right?
Professional Cooking Method
Now, let’s walk through the step-by-step process . after you’ve kneaded the dough until it’s smooth and elastic (8-10 minutes of that workout!), you’ll want to place it in a lightly oiled bowl, cover it with plastic wrap or a kitchen towel, and let it rise for about an hour.
Trust me, watching that dough puff up is one of the simple joys of baking.
When it comes to temperature control , keep your oven preheated to 375°f (190°c) for a perfect crust. you’ll know you’re hitting the sweet spot when the bread is golden brown and sounds hollow when tapped (around 25-30 minutes in the oven).
Expert Techniques
As we inch closer to that dinner table spread, here’s where the critical steps really stand out. once your dough is risen, punch it down! this releases the air—and let me tell you, it feels oddly satisfying.
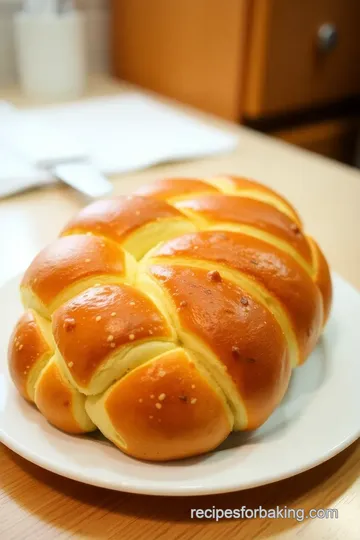
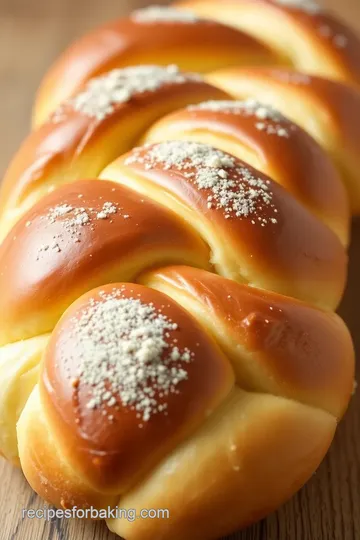
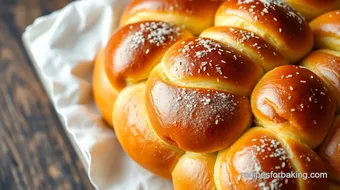
Then, divide the dough into three equal pieces and roll them out. here’s the fun part: braid those ropes together, pinch the ends, and voilà! you have your gorgeous braided bread .
For quality checks , use an egg wash before baking. This gives it a stunning shine and a golden finish that would make any baker proud.
Success Strategies
Ah, but what if things don’t go to plan? no bake is without its hiccups, so keep some troubleshooting tips handy.
If your dough isn’t rising, check your yeast freshness. also, ensure you’re in a warm spot—no chilly drafts allowed!
Always have a quality assurance routine. Look for that light, fluffy texture and that lovely golden hue. If it doesn’t smell divine, you might need to re-evaluate (but I’m sure it will!).
And remember, timing is everything. when your bread is freshly baked and cooled on a wire rack, don’t forget to slice it up and savor it with honey butter or fruit preserves.
Perfect for brunch or a sweet treat in the afternoon!
Now, if that sounds overwhelming, don’t worry! i’ll have your back with more additional information in the next section. we’ll explore everything from delicious variations to fun ways to share your homemade challah with friends and family.
Trust me, you don’t want to miss this part!
So, get your ingredients ready, prepare for a baking adventure, and let the delightful smells and flavors of this traditional jewish recipe fill your home! your family (and your taste buds!) will thank you.
Success Guaranteed Tips
Oh my gosh, let’s talk about how to make sure your homemade Challah turns out absolutely perfect, whether you're baking for a family gathering or a special Challah bake event .
Professional Insights
First off, get your yeast in check! i’ve had my fair share of challenges with yeast that just wouldn’t activate.
Always check the expiration date — nobody wants to be baking with old yeast, trust me.
Expert Techniques
While we're at it, those bread-making techniques can make or break your baked goods. kneading is key! get in there and knead that dough for a solid 8-10 minutes.
You’ll want it smooth and elastic, making it ready to rise gloriously.
Kitchen Wisdom
Don’t skimp on the egg wash ; it’s the secret behind that shiny, golden crust. brush it generously before popping the bread into the oven.
You’ll be thanking yourself later when you pull out those gorgeous loaves of braided beauty.
Success Guarantees
Always have a backup plan! if your challah isn't rising, it might be too cold. try placing it in a warm spot, like an oven set to low.
Isn’t it reassuring to know there are solutions for every hiccup?
Perfect Presentation
Now, let’s get down to the fun part — serving this beauty up!
Plating Techniques
Grab a beautiful wooden board or a decorative platter. Slice the Challah bread carefully, displaying that lovely braid. You could even leave it whole for a more rustic presentation.
Garnish Ideas
Consider sprinkling some sesame or poppy seeds on top for that authentic touch. It’ll make your Challah pop and look even more divine!
Serving Suggestions
Share it fresh from the oven, warm and inviting. You could spread some honey butter or serve it with jam. Honestly, what could be better?
Visual Appeal Tips
Take a moment to appreciate your creation before diving in. a little garnish can go a long way, plus it makes everything feel even more special, like it deserves its own baking event spotlight.
Storage and Make-Ahead
Let’s chat about keeping that Challah fresh and delicious!
Storage Guidelines
If you have leftovers — Yeah, right, who are we kidding? — store them in an airtight container. This helps retain that scrumptious moisture.
Preservation Methods
Freezing is your best friend! You can slice it and store it in a freezer bag, which means you can pull out a slice anytime for a thoughtful homemade treat.
Reheating Instructions
To reheat, just wrap your Challah in foil and warm in a low oven. It'll be like they were just baked!
Freshness Tips
Try to consume it within a couple of days — if you can resist, that is! With all the flavored Challah variations you could try, how could you not make things disappear?
Creative Variations
Let’s spice things up with some creative Challah twists!
Flavor Adaptations
What about adding some herbs like rosemary or even dried fruits for sweetness? I adore a cinnamon raisin version, perfect for breakfast!
Dietary Modifications
And hey, if you've got dietary restrictions, you can totally experiment. Use flaxseed instead of eggs for a vegan option, and swap honey for maple syrup.
Seasonal Twists
As the seasons change, so can your Challah ! Add pumpkin or zucchini in the fall, and you’ve got a festive bite.
Regional Variations
Don’t be shy! Explore traditional Jewish recipes from various regions. You might find exciting flavors you never knew you needed in your Challah !
Complete Nutrition Guide
I know what you’re thinking — what’s in this braided wonder?
Detailed Breakdown
A slice of Challah has about 120 calories, with a balance of carbs and protein. Pair it with a hearty soup, and you've got a filling meal!
Health Benefits
Moderation is the key here. With its nutrients, this bread can fit nicely into your meals, especially during those special Shabbat meals or holiday gatherings.
Dietary Information
Make sure you’ve got the right ingredients to suit your family’s dietary needs. There are so many ways to enjoy it, while keeping it friendly for everyone.
Portion Guidance
Generally, I like to cut my Challah into sizable slices — about 1 ounce each. Perfect for sharing, or just for enjoying yourself!
Expert FAQ Solutions
Finally, let’s tackle some of those burning questions!
Common Concerns
Is my dough too sticky? Just add a little more flour while kneading until it feels right.
Expert Answers
How do I know when my Challah dough consistency is right? It should be smooth and not cling to your fingers. You want it to feel soft but not overly sticky.
Troubleshooting Guide
If your Challah doesn't rise much, it could be too cold in your kitchen. Make a cozy spot for it to rise, even if that means snuggling it up in your oven.
Success Tips
Trust your instincts — if something feels odd, don’t hesitate to adjust! Remember, this is meant to be a joyous bread-making experience.
In conclusion, making challah is more than just baking; it’s a beautiful tradition steeped in culture and flavor. this journey of kneading, brhelping, and baking can bring friends and families together for a delightful experience.
So, gather up those ingredients and get that dough rising. happy baking, and may your challah always be fluffy, flavorful, and filled with fun memories!
Challah Bake Event: 5 Easy Steps for Delicious Braided Bread! Card
⚖️ Ingredients:
- 4 cups (480g) all-purpose flour
- 1/4 cup (50g) granulated sugar
- 1 packet (2 1/4 tsp) active dry yeast
- 1/4 cup (60ml) warm water
- 1/4 cup (60ml) vegetable oil
- 2 large eggs
- 1 egg for egg wash
- 1 tsp salt
- 1/4 cup (60ml) honey
- 2 tbsp sesame seeds or poppy seeds (optional)
- Sea salt for sprinkling (optional)
🥄 Instructions:
- Step 1: In a small bowl, combine warm water and yeast. Let sit for 5-10 minutes until foamy.
- Step 2: In a large bowl, whisk together flour, sugar, and salt.
- Step 3: Create a well in the center and add oil, eggs, honey, and yeast mixture. Mix until a rough dough forms.
- Step 4: Turn dough onto a floured surface. Knead for 8-10 minutes until smooth and elastic.
- Step 5: Form into a ball and place in a lightly oiled bowl. Cover and let rise in a warm place for 1 hour or until doubled in size.
- Step 6: Punch down the risen dough and turn out onto a floured surface. Divide the dough into three equal pieces. Roll each piece into a long rope.
- Step 7: Braid the ropes together and pinch the ends to seal.
- Step 8: Transfer braided bread to a parchment-lined baking sheet. Cover and let rise for 30 minutes.
- Step 9: Preheat the oven to 375°F (190°C). Brush the loaf with beaten egg and sprinkle with seeds and sea salt.
- Step 10: Bake for 25-30 minutes or until golden brown and hollow when tapped. Allow to cool on a wire rack.
Previous Recipe: Cereal baked blend: 5 Easy Ways to Create Crunchy Snack Bars!
Next Recipe: Ultimate cheese steak baked potato: 5 Easy Variations for Comfort Food!