Creepy Chocolate Peanut Butter Spiders
Craving a fun dessert? Let me show you how to make chocolate peanut butter spiders fast! They're perfect for Halloween and oh-so-delicious.

- Getting Spooky with Creepy Chocolate Peanut Butter Spiders
- The Essential Ingredients Guide to Making Creepy Chocolate Peanut Butter Spiders
- Unlocking Professional Cooking: Essential Steps to Get You Cooking Right
- Step-by-Step Process You Can Follow with Confidence
- Expert Techniques to Sweeten the Deal
- Success Strategies for Kitchen Mastery
- Additional Recipe Information
- Recipe Card
Getting Spooky with Creepy Chocolate Peanut Butter Spiders
Oh my gosh! i can’t tell you how many times around halloween i’ve found myself scrambling for the perfect treat to whip up.
A few years back, i was knee-deep in a cookie catastrophe, flour everywhere, when my little nephew popped in, all dressed as a dinosaur.
“auntie! can we make something with spiders??” he asked, wide-eyed. just like that, i knew we had to make chocolate peanut butter spiders fast .
They’re a fun food idea that’s not just perfect for halloween but also an easy dessert that kids will love.
The Fun Backstory of Spiders
So, here’s a little history for ya: the original idea of creepy crawly snacks goes way back, where using fruits and nuts creatively made fun little edible crafts.
Fast forward to today, and it’s all about the chocolate spider recipe taking the spotlight. these halloween treats have become so popular that i’ve seen them pop up at parties, classrooms, and even in sunday school snack times!
The best part? they’re simple to make. seriously! you can whip these up in about 45 minutes with zero baking required.
Just a quick prep time of 15 minutes and a little chilling makes these spiders come to life. plus, they cost next to nothing, making it a budget-friendly dessert option, too!
Key Benefits: Why You’ll Love These Spiders
Did you know peanuts are a great source of protein? so, these chocolate-covered snacks not only satisfy that sweet tooth but also give a little nutrition boost—score! if you're looking for healthy sweet treats , these bad boys give you a satisfying crunch without the guilt.
And let’s talk occasions! these spiders aren’t just for halloween; they can be a hit in birthday parties, school events, or whenever you want to impress the kids.
They are easily customizable, too. wanna have a spider on a web? use some edible string candy for presentation!
For those of you wondering why they are better than traditional cookies, let me hit you with this: there’s no baking.
That’s right! no waiting for an oven to preheat or cleaning up that pesky flour mess. these are fast and easy recipes that leave you more time for what really matters—chilling with family or binge-watching your favorite show.
Plus, you can even make nut-free alternatives if you have allergies in the crew!
Let’s look into Into the Ingredients!
Alright, friends, i’m fired up! if you’re ready to create these whimsical desserts, stick around for the next section for a full list of ingredients.
You’re just a handful of items away from making some creepy, crawly yet deliciously delightful chocolate peanut butter spiders . the whole family can get in on this, making it a wonderful experience of cooking with kids .
Trust me; it’ll be messy but so worth it!
The Essential Ingredients Guide to Making Creepy Chocolate Peanut Butter Spiders
Alright, folks! let’s dive into some essential ingredients you absolutely need to whip up your delightful chocolate peanut butter spiders for halloween—or whenever you're in the mood for some fun treats! trust me, these little critters are not just cute; they're downright delicious! and the best part? you can make chocolate peanut butter spiders fast .
So, let’s break down what you’ll need.
Premium Core Components: The Essentials
First up, let's go over some premium core components . You’ll want to pay attention to quality here!
- Creamy Peanut Butter (1 cup/240 g) : Go for high-quality, unsweetened peanut butter. Look for that smooth texture so it spreads like a dream. Check the label for oils—minimal is best. Store it in a cool, dry place, and it usually lasts about 3-4 months .
- Powdered Sugar (½ cup/60 g) : Make sure it’s fresh and soft. A quick way to check? It should feel light and not clumpy. Powders can last about 2 years when kept sealed.
- Semi-Sweet Chocolate Chips (1 cup/120 g) : Your chocolate is crucial! Look for a good brand. Funky flavors or dull colors? Nope. You want it shiny and vibrant. Keep it cool and use within 1 year.
Signature Seasoning Blend: Spice it Up!
Okay, spices might not seem essential in a dessert, but little additions can crank up the yum factor!
- Salt (Pinch) : This little guy helps to enhance the flavor of your tasty peanut butter. Trust me; don’t skip it!
- Optional Add-Ins : If you wanna jazz it up, sprinkle in a bit of cinnamon or nutmeg for some warmth, or try using different herbs like rosemary if that's your jam!
Smart Substitutions: Mix and Match
Now, let's chat substitutions! Sometimes you just gotta use what you have on hand.
- Nut-Free Alternative : If you’re avoiding nuts, sunflower seed butter works fine. Plus, it’s still creamy!
- Vegan Options : Use dairy-free chocolate chips or simply opt for maple syrup instead of powdered sugar.
- Quick Fixes : Out of powdered sugar? Regular sugar works, just give it a blitz in a food processor first.
Kitchen Equipment Essentials: Get Prepped
Hands up if you've been in the kitchen with a recipe but had to pause 'cause your tools were a mess! Let's not let that happen!
- Must-Haves : You’ll need a microwave-safe bowl , a mixing spoon , and a baking sheet lined with parchment . Super simple stuff, but it makes everything easier!
- Cooler Suggestions : Have a small scoop? Perfect for rolling those peanut butter balls! Just a little investment in the right tools can save time in the long run.
Tips for a Smooth Process
So, you got your ingredients and tools? Awesome. Here are some quick tips to make the process even smoother:
- Chill Time is Key : After forming those cute little spider bodies, chill them in the fridge for 20- 30 minutes before dipping in chocolate. It helps them hold their shape!
- Mixing the Chocolate : Keep melting your chocolate in 30-second intervals . No one likes burnt chocolate, people!
- Let Kids Join In : This is a fantastic opportunity for some quality time! Get the kiddos involved in rolling the balls or adding the candy eyes . It’ll be a great bonding experience and makes for fun food ideas.
Now that we’ve covered the essentials, it’s time to get into the real fun: crafting those spiders! You’ve got the groundwork laid, and I can’t wait for you to get started on these whimsical desserts ! Let's jump into those step-by-step instructions and create the cutest, tastiest, and most impressive treats for Halloween that’ll have everyone saying, “Wow!” Ready? Here we go!
Unlocking Professional Cooking: Essential Steps to Get You Cooking Right
So, you wanna cook like a pro? let’s dive into some essential preparation steps that can transform your home kitchen into a culinary playground.
Trust me, it’s all about getting organized and knowing what you’re doing from the get-go.
Start with Mise en Place
First off, we need to talk about mise en place . it’s just a fancy french term for “everything in its place.
” before you even think about turning on the oven, gather all your ingredients and equipment. think of it like setting the stage for a concert – you wouldn’t want to start playing your guitar with no amplifier handy, right? this step saves you a ton of time and stress when you're knee-deep in flour and spices.
Time Management Tips
Now that you’re set up, let’s chat time management. make a game plan! break your cooking process into clear steps and tackle them one by one.
It’s like following the playbook at a football game – you gotta have strategy. a little tick-tock can keep your dinner from turning into a six-hour ordeal.
For example, if you need to boil water, start that first while you chop veggies. efficiency, baby!
Organization Strategies
Next, organization is key. keep your workspace tidy. you don’t want old tomato sauce splatters from last week’s spaghetti distracting you while you're frying chicken.
Clean as you go! it makes the whole process smoother. plus, you won’t freak out when you can't find the spatula in all the chaos.
Safety Considerations
And let’s not forget safety. always use a cutting board and keep your knives sharp. a dull knife is way more dangerous than a sharp one.
Oh, and wash your hands as you bounce between tasks. we’re not trying to host any foodborne illness parties, especially when whipping up halloween treats like my favorite, creepy chocolate peanut butter spiders !
Step-by-Step Process You Can Follow with Confidence
Yes, i’m talking clear, numbered instructions like a pro chef. you start with the basics. temperature control is crucial for certain cooking methods.
Use a thermometer to check that your meats reach a safe internal temp, about 165° f for poultry, for instance.
Timing is equally important. whether you are brewing coffee or roasting veggies, know how long each item takes. the old “watch the clock” rule applies here.
And trust me, visual cues for doneness are like a cooking cheat sheet! you learn their signals, and the kitchen feels like home.
Expert Techniques to Sweeten the Deal
Now, let’s sprinkle in some expert techniques . remember to always taste your food. it's a critical step! if it lacks flavor, add more seasonings gradually.
And keep an eye out for quality checkpoints; not everything goes according to plan. sometimes your chicken might roast faster than your potatoes.
Adjust as needed.
Oh, and if things go wrong? No sweat! Here’s your troubleshooting cheat sheet: Too salty? Add a little sugar or vinegar. Dish looks dull? A splash of fresh herbs can amaze.
Success Strategies for Kitchen Mastery
Finally, let’s chat about success strategies. i’ve made my share of mistakes. like, don’t ever underestimate the power of too much garlic.
It feels great to toss ‘some' in, but you’re cooking, not creating a vampire repellant!
Quality assurance is huge too. Taste as you go, and remember—it's all about balance. If something seems too heavy, lighten it up with lemon juice or herbs.
And if you’re in a pinch? consider make-ahead options . many meals are excellent when stored overnight. chicken curry, pasta, and yes, you can even prep your chocolate peanut butter spiders ahead of time for a fun food idea that kids will love on halloween.
Wrap-Up and Transition
So there you have it! with these professional cooking methods and tips, you’ll be ready to whip up stunning dishes.
Remember, cooking is a journey, not a race. each failure leads to a solid win, especially when trying out easy desserts or focusing on kid-friendly recipes .
Next up, let’s explore some additional information —some easy chocolate recipes that’ll knock your socks off!
Additional Recipe Information
When you're looking to make chocolate peanut butter spiders fast , you’ll want to have a few insider tips to bump up your game.
Seriously, these little critters are not just eye-catching; they’re delicious too! let me spill some secrets to help you ace these halloween treats like a pro.
Pro Tips & Secrets
First off, don't skimp on chilling. i mean, really, the secret to a perfect spider body is making sure that the peanut butter mixture is nice and firm.
Toss those peanut butter balls in the fridge for at least 20 minutes before you dip them in chocolate. pro tip: use a cereal bowl (yes, a cereal bowl) for easier mixing.
It's rounded shape helps get everything blended well!
Next up, when it comes to chocolate coating, melt that chocolate slowly. you might feel rushed, but melted chocolate is best handled in 30-second intervals in the microwave.
Stir in between—this is where you really want to shine, my friend!
As for flavor enhancement, a pinch of sea salt in your peanut butter mixture will balance all that sweetness. Trust me, it makes a world of difference!
Perfect Presentation
Now, let’s talk about plating. i know, i know, who really cares about the look? but a cute presentation takes these peanut butter snacks to a whole new level! arrange your spiders on a festive platter and toss in some halloween-themed decorations like fake spider webs or mini pumpkins.
For garnishes, consider edible glitter or colored sprinkles. they can really bump up the visual allure. plus, kids love the sparkle! oh, and don’t forget about those candy eyes decorations .
They’re like the cherry on top of this spooky sundae!
Storage & Make-Ahead
Planning a halloween bash? you can totally make these ahead! store your chocolates in an airtight container. they'll last up to a week in the fridge.
Pro tip : keep a piece of parchment paper in between layers so they don’t stick. if you want them to last even longer, pop ‘em in the freezer—they can last up to 2 months that way.
When it’s party time, let them sit out for about 15 minutes to bring them back to that deliciously soft texture.
You want that chocolate shell to have just the right snap when you bite in!
Creative Variations
Don't be shy about making these chocolate spider recipe your own! Wanna kick things up? Try using Nutella for a hazelnut twist.
If you're looking for gluten-free dessert options , go with gluten-free pretzel sticks. you can even throw in some candy corn for seasonal flair or swap out for vegan chocolate chips if you're being health-conscious.
The world is your oyster when it comes to these creative snacks for kids .
Complete Nutrition Guide
Not all sweet treats are created equal, and these little guys are no exception. in moderation, they pack a good punch.
Each spider gives you a nice dose of protein and healthy fats thanks to the peanut butter. if you trade out those chocolate chips for dark chocolate, you’ll also be getting a kick of antioxidants! it’s true! just remember portion control here; they’re small but mighty.
Expert FAQ Solutions
Common question alert: “what if my chocolate doesn’t coat well?” no worries! if your chocolate starts to thicken, just pop it back in the microwave for a few seconds.
Another lifesaver—don’t forget to press on those candy eyes while the chocolate is still wet. this makes it easier for them to stick.
And for those interested in troubleshooting, if you happen to find the peanut butter mix a bit too sticky while shaping, dust your hands with a bit of powdered sugar to help out.
Conclusion
At the end of the day, making these whimsical desserts should be fun and easy! they’re perfect for gatherings, but honestly, you can whip them up any time you’re in the mood for something sweet.
So grab the kids, roll up those sleeves, and make chocolate peanut butter spiders fast this halloween season. you’ll be the hero of any party, and trust me—your friends (and taste buds) will thank you! happy cooking!
Creepy Chocolate Peanut Butter Spiders Card

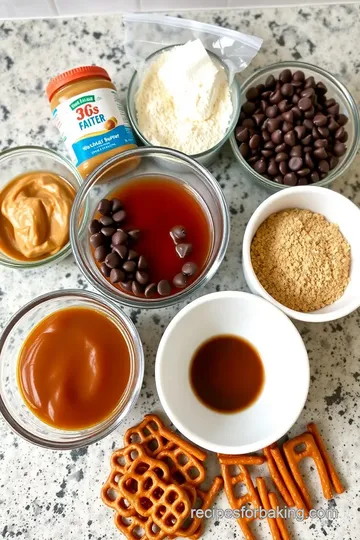
⚖️ Ingredients:
- 1 cup creamy peanut butter (unsweetened)
- ½ cup powdered sugar
- 1 cup semi-sweet chocolate chips
- 24 mini pretzel sticks
- 12 candy eyes
- Pinch of salt
🥄 Instructions:
- Step 1: In a bowl, combine creamy peanut butter, powdered sugar, and a pinch of salt. Mix until smooth and well combined.
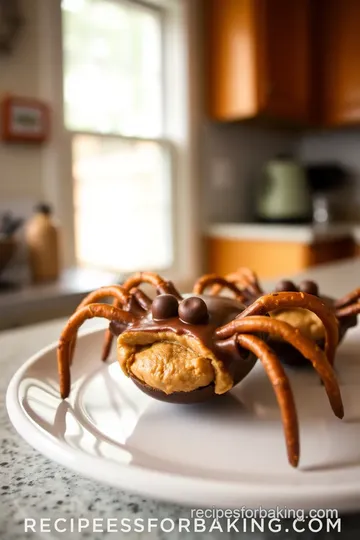
- Step 2: Using your hands, form the peanut butter mixture into 12 small balls (about 1-inch in diameter) and place them on the lined baking sheet.
- Step 3: Refrigerate the peanut butter balls for 20-30 minutes to firm up.
- Step 4: In a microwave-safe bowl, melt the chocolate chips in 30-second intervals, stirring between each until smooth.
- Step 5: Dip each chilled peanut butter ball into the melted chocolate
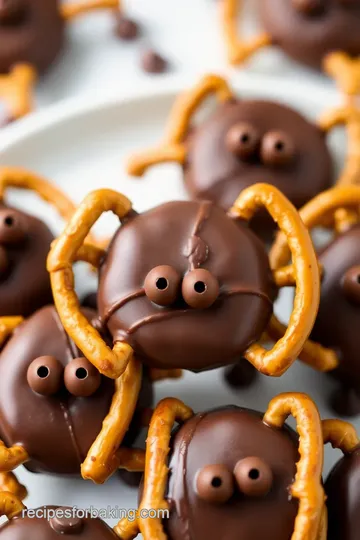
- Step 6: While the chocolate is still wet, insert four mini pretzel sticks into each side of the chocolate-coated balls to form legs.
- Step 7: Gently press two candy eyes onto the top of each spider before the chocolate hardens.
- Step 8: Refrigerate again for about 10 minutes to set the chocolate completely.
Previous Recipe: Easy Grill Chicken with Zesty San Antonio Marinade: A Flavorful Delight
Next Recipe: My Family's Favorite: Grilled Flank Steak with Crispy Egg Rolls!