Heavenly Baked Pears with Gorgonzola and Honey
Discover my easy recipe for baked pears with gorgonzola and honey! A sweet and savory delight, perfect for impressing guests or enjoying a cozy night in.

- Finding Joy in Baked Pears with Gorgonzola and Honey
- Essential Ingredients Guide
- Mastering Professional Cooking: Your Guide to Success in the Kitchen
- Pro Tips & Secrets for Baked Pears with Gorgonzola and Honey
- Perfect Presentation for Your Dish
- Storage & Make-Ahead Tips
- Creative Variations You Can Try
- Complete Nutrition Guide
- Expert FAQ Solutions
- Recipe Card
Finding Joy in Baked Pears with Gorgonzola and Honey
Oh my gosh, have you ever just had one of those days where you want to treat yourself without feeling like you've gone overboard? well, i did—right in my own kitchen.
I stared at a few juicy pears on my counter, all ripe and ready for something magic. that's when it hit me.
Baked pears with gorgonzola and honey ! it sounds fancy, but honestly, it’s super easy. i mean, what could be better than that classic sweet and savory combo? seriously, i could eat this every day!
A Quick Deep look into into the Recipe
Let me take you back. this delightful dish draws its roots from mediterranean-inspired recipes . it’s all about those flavor combinations that make your taste buds dance.
You know, pairing sweet fruits with sharp, tangy cheese? it’s not just old-school; this dish is incredibly relevant today! it’s popping up everywhere, from elegant dinner parties to cozy family dinners.
You can whip it up in just 35 minutes —prep and all! talk about quick recipes for guests!
And what about the cost? it's pretty wallet-friendly too. with some ripe pears, a hunk of gorgonzola, and a drizzle of honey, you're in gourmet territory without breaking the bank.
Plus, this recipe serves four, so you can gather your favorite people and share the love!
Why You’ll Adore This Dish
Now, let’s talk about the big wins with this recipe. for starters, baked pears with gorgonzola and honey pack quite a nutritional punch.
Pears are loaded with fiber, while gorgonzola gives you that rich, creamy goodness. the honey adds just the right touch of sweetness, making it a perfect healthy dessert option.
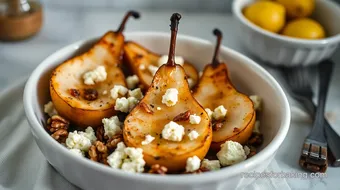
Did i mention the walnuts? they give a satisfying crunch that you've gotta try!
This dish is also perfect for those special occasions. Think about it—what’s classier than serving up elegant appetizers that nod to a gourmet kitchen? Whether it's Thanksgiving, an anniversary, or just Friday night, these pears don’t just look stylish; they taste divine!
Plus, if you really want to impress? think of how versatile these stuffed pears can be! they can serve as an easy appetizer, a light dessert, or even an unexpected side dish.
You can genuinely wow your guests with minimal effort. who doesn’t want a dish that offers a sweet and savory balance?
Time to Gather Our Ingredients!
Ready to dive in? we'll get to the nitty-gritty of mixing it all together. but before we do, i want you to remember that cooking should be fun! so, grab your favorite music, maybe pour yourself a glass of wine, and let’s make some magic together.
Trust me, you’ll want these sweet and savory combinations in your life, especially while the fresh herbs are still in season!
So, let's check out what you’ll need for this spectacular baked pear recipe , and then we’ll get cooking. You’re gonna love this—promise!

Essential Ingredients Guide
When it comes to cooking, having the right ingredients at your fingertips is like having a treasure map—it opens up a world of possibilities! let’s dive into what you need to whip up some culinary magic, like those baked pears with gorgonzola and honey that’ll knock your socks off.
Premium Core Components
First things first, measurements matter . whether you’re in the us or measuring in grams, knowing how much of each ingredient to use is crucial.
For example, when making our fabulous baked pear recipe, you’ll want 4 medium ripe pears and about 100g of gorgonzola cheese for that creamy touch.
Quality is key too! look for pears that are firm but slightly soft to the touch. if you can smell them, you’re likely onto something good.
Store those pears in a cool, dry place, and they’ll be your friends for about a week. for the best freshness, eat them when they’re just ripe.
And don’t forget, you can always give them a little squeeze—if they yield slightly, you’re in business!
Signature Seasoning Blend
Now, let’s talk spices—because no dish is complete without them! for baked pears, the classic combo of gorgonzola and honey makes those sweet and savory flavors sing.
Add a sprinkle of black pepper to cut through the richness, and you’ve got a treat that’s perfectly balanced.
Don't sleep on herbs either! fresh sprigs of thyme or rosemary take your pears from good to gourmet. you see, pairing those cozy herbs with sweetness is a total game changer—trust me on this one.
Smart Substitutions
Even if you’re out of gorgonzola or pears, don’t sweat it! there are always alternatives lying around. goat cheese or feta works just as well, and if pears are out of season, apples can be a perfect stand-in.
Run out of honey? maple syrup can save the day—who doesn’t love a good maple twist?
Keep in mind dietary restrictions too; these swaps can help accommodate everyone at your table. whether you have vegan friends who need agave syrup or gluten-free peeps, your baked fruit recipe can still shine.
Kitchen Equipment Essentials
Alright, let’s chat tools! no need to go overboard here. the basics you’ll need include a sharp knife for your pear prep, a mixing bowl to toss your fillings, and a baking dish (roughly 8x8 inches will do the trick).
Want to keep it even simpler? line your baking sheet with parchment paper—clean up is a breeze. also, let’s be real: you don’t need a fancy melon baller to core those pears.
A spoon works just fine!
Freshness Tips and Selection Criteria
When choosing your ingredients, always opt for the freshest ones. ripe pears with good color are a sign of flavor.
For your cheese, look for gorgonzola that’s creamy and not too crumbly. fresh and flavorful will make your dish sing.
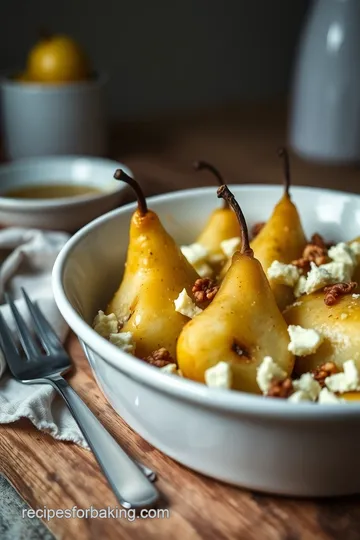
After you've whipped up these gourmet fruit desserts , make sure to serve them warm to really make those flavors pop! this dish can double as an elegant appetizer or a light dessert—perfect for impressing guests.
And hey, don’t forget to top with those nut toppings you saved from the walnuts. they add that crunch which just hits different!
Cooking can be a journey, just like perfecting your sweet and savory combinations to create those easy appetizer recipes . With some basic knowledge and these essential ingredients, you’ll have your friends raving about your culinary skills!
With all that said, are you ready to get into the nitty-gritty of how to put this delectable dish together? let's move on to the exciting part: the step-by-step instructions.
You’re going to love how simple it is to create this charming dessert that’ll make every meal feel special.
Mastering Professional Cooking: Your Guide to Success in the Kitchen
Cooking like a pro seems daunting, right? but honestly, it’s all about getting organized and following some key steps. whether you’re making something simple like baked pears with gorgonzola and honey or tackling a more complex dish, these tips will help you shine in the kitchen.
Let’s dive into the essentials!
Essential Preparation Steps
First things first – let’s talk about mise en place. it sounds fancy, but it just means having everything ready to roll before you start cooking.
This means gathering all your ingredients, measuring them out, and having your tools handy. trust me, preparing your space like this makes cooking way less stressful.
Now, onto time management. set up a timeline for your cooking process. if you know you’ll be baking those pears for 25 minutes , make sure you use that time wisely! chop your walnuts or wash your herbs while the oven is preheating.
It’s all about using those precious minutes effectively.
And organization is key. keep your workstation clean and clutter-free. when you’re whipping up those savory baked fruits , a tidy space will help you focus on the fun part – cooking! also, remember safety first, folks.
Use a cutting board, keep sharp knives away from little fingers, and make sure to handle hot items with care.
Step-by-Step Process
Ready to get cooking? Here’s a simple breakdown.
-
Preheat the oven: Fire it up to 375° F ( 190° C) .
-
Prep the pears: Wash, halve, and core them. You want them to be ripe yet firm, so they hold their shape when baking.
-
Mix the filling: Combine crumbled Gorgonzola (that creamy goodness) with those chopped walnuts. Sprinkle a touch of salt and pepper before moving onto the next step!
-
Stuff those pears: With the pear halves cut-side up, take that filling mix and pile it in.
-
Drizzle time: Just like with the honey in our honey dessert recipes , don’t be shy. You want a good coating.
-
Bake: cover the dish with foil and put it in the oven for 15 minutes . then, take off the foil and let them bake for another 10 minutes .
Keep an eye on them—you want the pears tender and the cheese bubbly.
-
Garnish and serve: Serve those beauties warm, maybe with some fresh herbs for color.
Expert Techniques
So, how can you take this baked pear recipe to the next level? Here’s where the real magic happens.
-
Check your pears: You don’t want them mushy, so look for that slight give when you poke them. That’s your cue to pull them out.
-
Nailing the temperature: Gorgonzola loves to melt, but not too much! Keep it around that 375° F mark to avoid scorching.
-
Quality control: Tasting is key! A quick nibble of that filling mixture ensures balanced flavors before you bake.
-
Troubleshooting: If the pears aren’t softening quickly enough, pop them back in for a few more minutes. Cooking times can vary based on the pear type.
Success Strategies
Let’s avoid those common hiccups!
-
Don't skip prep: Seriously, when you’re short on time, it’s easy to skip gathering ingredients. Big mistake—trust the process!
-
Quality ingredients matter: Go for fresh pears and high-quality Gorgonzola. They will make a difference.
-
Perfect results: If things go sideways, no worries. You can always serve the pears with a scoop of vanilla ice cream, turning any mishap into a decadent dessert.
-
Make-ahead options: Pre-stuff the pears and keep them in the fridge before baking. Super convenient for those unexpected guests or lazy Sundays!
In the end, cooking is all about experimenting and finding the flavor combinations that tickle your taste buds, like that sweet and savory dance in our baked pears.
Participating in a cooking journey is like a good story, where each recipe unfolds different exciting chapters. so, whether you're just starting or looking to refine your skills, remember that practice makes perfect!
Additional Information:
Stay tuned as I dive even deeper into Mediterranean-inspired recipes, sharing tips, and tricks to add flair to every dish you create!
Pro Tips & Secrets for Baked Pears with Gorgonzola and Honey
Oh my gosh, let’s talk about making those baked pears with gorgonzola and honey sing! here are some of my top secret tips to level up your game.
First off, when you're shopping for pears, grab them when they're a little firm. trust me, they’ll hold their shape better as they bake.
Now, for the cheese, let that gorgonzola sit out for a bit before mixing. it spreads easier, and you’ll get that creamy goodness throughout.
And don't forget the walnuts— they add such a satisfying crunch that balances the soft pears and creamy cheese. honestly, i sometimes even toss in a pinch of cinnamon for that warm, cozy vibe that just screams, “i’m here for a gourmet experience!”
Time-saving? try prepping your pears ahead of time. just store them in a bit of lemon water to keep them from browning.
When guests arrive, just pop those bad boys in the oven, and you’ll look like a total rockstar, even if you were just drinking coffee ten minutes ago.
Perfect Presentation for Your Dish
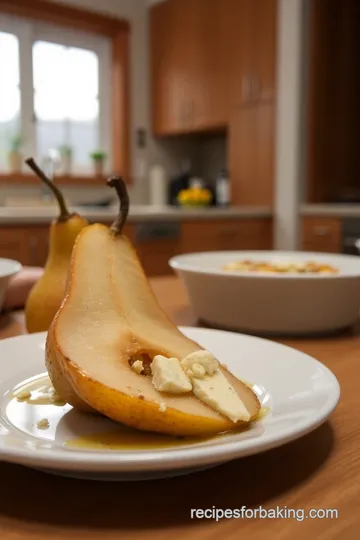
Now, let’s talk about making those baked pears look as good as they taste . presentation is key here, folks! when you serve, place each stuffed pear half on a plate, and drizzle some extra honey over the top.
Oh la la, right?
Color is everything. i love using fresh thyme or rosemary as garnishes for a pop of green. it not only looks fancy but adds those delightful herbaceous notes to the dish.
Think about your plate colors, too! a white plate makes the pears and cheese really shine . it’s all about that visual appeal , you know?
Storage & Make-Ahead Tips
If you’re planning to make these baked pear recipe gems ahead of time, here’s what you do: after baking, let them cool completely before covering them with plastic wrap.
They'll last about 2-3 days in the fridge. when it comes time to serve again, just pop them back in a 350° f oven for about 10 minutes to warm up.
Just remember, they’re best eaten fresh, but sometimes life calls for leftovers, and that’s okay!
Creative Variations You Can Try
Feeling adventurous? let’s shake things up a bit! you could swap in goat cheese for the gorgonzola if you’re snacking on something a little milder.
Or, if it’s the holiday season, consider stuffing those pears with a mix of cranberries and nuts for a festive twist.
If you're into a sweet and savory combination , drizzle a little balsamic reduction over the top.
Swap those pears for apples if you're in a pinch—they still work like a charm! And if you’re looking for something seasonal, consider using figs or plums , which also bake beautifully.
Complete Nutrition Guide
Let’s break it down—this dish is not just delicious, it’s pretty good for ya, too! with pears being high in fiber and gorgonzola giving you some protein, it’s a win-win.
Each serving packs around 190 calories, so it's a light dessert option that won’t wreck your day.
Got dietary considerations? This dish is vegetarian, and if you swap honey for agave syrup, it’s vegan-friendly, too. Just be careful with portions, though; it’s easy to want to dive into a few more baked pears than necessary, given how amazing they are!
Expert FAQ Solutions
Now, let’s tackle some burning questions that often come up.
“Can I make these ahead of time?” Yes, absolutely! Just follow the storage tips I mentioned before.
“What if the cheese doesn’t melt properly?” Let it sit at room temperature before using. It should melt beautifully!
“any tips for making these perfect?” watch the final cooking time closely. you want those pears just soft enough but not mushy.
And remember—not all pears are created equal; some bake faster than others!
So, whether you’re serving these as an elegant appetizer or a light dessert, baked pears might just become your go-to recipe.
In conclusion, give these baked pears a shot! whether you're hosting a fancy dinner or just treating yourself (which, let's be honest, we all deserve), this dish is the real deal .
Get creative, have fun with it, and most importantly, enjoy each flavorful bite of this sumptuous blend of sweet and savory.
Happy cooking!
Heavenly Baked Pears with Gorgonzola and Honey Card
⚖️ Ingredients:
- 4 medium ripe pears (e.g., Bosc or Bartlett)
- 100g (3.5 oz) Gorgonzola cheese, crumbled
- 50g (1.75 oz) walnuts, roughly chopped (optional)
- 2 tablespoons (30 ml) honey
- 1 tablespoon (15 ml) olive oil
- Pinch of salt
- Freshly ground black pepper (to taste)
- Fresh thyme or rosemary sprigs (optional)
🥄 Instructions:
- Step 1: Preheat the oven to 375°F (190°C).
- Step 2: Wash and halve the pears lengthwise. Core the pears using a melon baller or spoon.
- Step 3: In a mixing bowl, combine crumbled Gorgonzola and walnuts. Season with a pinch of salt and a dash of black pepper.
- Step 4: Place pear halves in a baking dish, cut side up. Fill the center of each pear with the Gorgonzola-walnut mixture.
- Step 5: Drizzle olive oil and honey over the stuffed pears.
- Step 6: Cover the dish with foil and bake for 15 minutes. Remove the foil and bake for an additional 10 minutes, or until pears are tender and cheese is golden.
- Step 7: Remove from oven, garnish with fresh herbs (if using), and serve warm.
Previous Recipe: How to Make Delicious Baked Oats with Nutella: An Easy Breakfast Treat
Next Recipe: The Secret to Amazing Baked Potatoes in Dutch Oven Camping