Baked Kit Kat Bars
Love baked kit kat? Discover how to make these delicious, homemade Kit Kat bars with a crispy crust and gooey filling. Easy recipe for chocolate lovers! Try it today.

- Baked Kit Kat Bars: A Culinary Journey
- What Makes This Recipe Special
- Health and Nutrition Highlights
- Recipe at a Glance
- Master Ingredient List
- Kitchen Equipment Essentials
- The Ultimate Guide to Creating Baked Kit Kat Bars
- Master Chef's Advice
- Perfect Presentation
- Storage and Make-Ahead
- Creative Variations
- Complete Nutrition Guide
- Expert FAQ Solutions
- Recipe Card
Have you ever wondered why some desserts make you feel like a kid again? you know, that giddy rush that comes with the first bite of something deliciously sweet? well, if you’ve got a soft spot for chocolate and a love for crispy, crunchy bites, let me introduce you to the world of baked kit kat bars.
This recipe is special because it takes the classic kit kat and brings it right out of the wrapper and into a delightful layered treat! with a medium difficulty level, it’s totally doable within an hour, and trust me, it’s worth every minute (and every crumb)!
The kit kat bar, with its signature crispy wafers and chocolate coating, dates back to the 1930s and was a beloved treat even before it became a staple of 80s candy aisles.
Its very name conjures images of friendly breaks and shared moments, a kind of cultural touchstone in the candy world.
Now imagine that but in a homemade baked version! these baked kit kat bars elevate the iconic treat into an indulgent dessert that not only satisfies your cravings but also impresses your friends at any gathering.
Its unique layers of rich chocolate and airy wafers have a way of making every bite feel like a mini celebration.
What makes this recipe even more appealing—besides the chocolate, of course—is its versatility! with easy adjustments, we can cater to all diets, like gluten-free or even dairy-free options.
Plus, the baking techniques used here are beginner-friendly, so you don't need to be a master baker to whip this up.
Baked Kit Kat Bars: A Culinary Journey
Let's take a moment to dive into this rich culinary heritage . the kit kat culture is more than just a candy bar; it reflects shared experiences and connections.
Picture this: a cozy afternoon with friends, laughter echoing as you all share chocolate-covered memories. the origin story of this recipe bridges the gap between childhood nostalgia and adult creativity—a fantastic journey from confectionery aisle to your very own kitchen.
While kit kats have surged through popularity since their debut, they show no sign of leaving our hearts (or our snack cabinets) anytime soon.
This recipe taps into that trend by transforming a crispy chocolate bar into something warm, gooey, and perfect for parties or just a lazy sunday treat.
What Makes This Recipe Special
Now let’s chat about what makes these baked kit kat bars pop! first off, the unique flavor combinations of the crispy wafer crust, rich chocolate cream filling, and silky topping are simply divine.
It’s like a party for your taste buds! the foolproof techniques are perfect even for beginners. you can impress your pals without any stress because the expert-tested method is quite forgiving.
Oh, and don’t skip out on the time-saving tips ; while you chill the bars, you can whip up some homemade whipped cream or brew a nice coffee to enjoy alongside.
This isn’t just a treat—it’s an experience!
Health and Nutrition Highlights
Of course, let’s not ignore that even indulgent dessert recipes can have some nutritional perks! the key benefits of this recipe include a good dose of energy from carbohydrates with the sweetness of sugar.
And for those wondering—yes, you can find ways to lighten up! there are dietary considerations for everyone; you can tweak the ingredients for a dairy-free dessert option or use gluten-free baking substitutes.
Think of the wellness advantages —enjoying delightful treats like these in moderation is all part of a balanced lifestyle! Did I mention how satisfying those sweet chocolate bites can be?
Recipe at a Glance
Ready to make some delicious memories? Here’s the quick rundown:
- Total Preparation Time: 1 hour and 5 minutes
- Skill Level Required: Medium
- Serving Size Details: Yields about 12 bars
- Cost Efficiency: Totally worth it for the satisfaction!
So, whether you want to impress at a gathering or simply satisfy that persistent sweet tooth, Baked Kit Kat Bars are just what you need.
Now that you’re all excited about making these treats, let’s dive into the ingredients section , and trust me, your shopping list is going to look delicious!
Let’s grab those ingredients so you can whip up your very own Baked Kit Kat Bars! You're going to love how easy (and tasty) this all turns out!
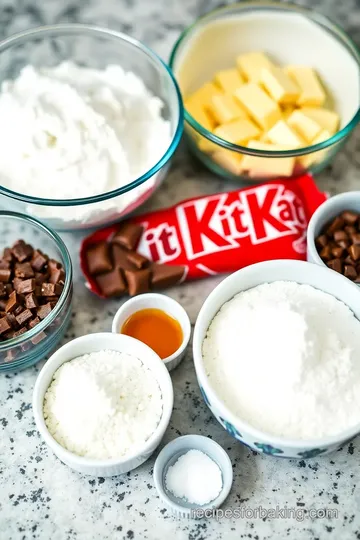
Master Ingredient List
So, you’ve decided to dive into the delightful world of baking. Yay! Let's chat about all those premium core ingredients you'll need for your upcoming chocolate adventure, which, spoiler alert, ends with Baked Kit Kat Bars that your friends will be raving about!
Premium Core Ingredients
Alright, first off, we need the basics. Here’s a detailed rundown of the essential ingredients:
-
1 ½ cups all-purpose flour : This is your foundational building block. Go for a good quality because the fluffier your flour, the fluffier your treats!
-
½ cup powdered sugar : Ahh, the sweet stuff! Always buy the finest quality; nothing ruins a cake like gritty sugar.
-
½ cup unsalted butter, melted : Seriously, quality butter changes everything. Look for European-style butter if you can; it’s creamier!
-
1 large egg : Room temp is best for mixing, making sure it combines seamlessly.
-
1 tsp vanilla extract : Go for real vanilla, not that synthetic nonsense—it brings depth to your chocolate bars.
-
½ tsp salt : Even a little salt makes the sweet flavors pop!
Signature Seasoning Blend
Now, while baking might seem straightforward, the magic is in the details. Here’s where our signature seasoning blend steps in:
-
Chopped Kit Kat Bars : Yup, they’re both for your filling and a touch of nostalgia. You can't go wrong!
-
¼ cup granulated sugar : Sweetness on top of sweetness!
-
½ cup semi-sweet chocolate chips : This brings that indulgent touch—melt it for the topping!
Smart Substitutions
What if you find yourself out of an ingredient? No worries! Here are smart substitutions :
-
Gluten-free flour : Use this instead of all-purpose for your fellow gluten-free friends.
-
Coconut cream : Replace heavy cream for a lighter, dairy-free version.
-
Chocolate bars : If you’re feeling adventurous, swap out Kit Kat for Twix or even Snickers for a completely new treat.
Kitchen Equipment Essentials
Let's chat about the kitchen equipment essentials you’ll need to whip up these delightful bars.
-
9x9-inch baking dish : Honestly, this is a must-have. You could use something similar, but the size really matters for even baking.
-
Mixing bowls and a whisk : You can’t bake without mixing!
-
Spatula : Silicone or rubber works best for scraping and lifting.
-
Parchment paper : It makes removal a breeze! It's like having a personal assistant.
Pro Ingredient Tips
Here are some pro ingredient tips to up your baking game:
-
Inspect for freshness : Always check expiration dates, especially for powdered sugar and baking essentials.
-
Store properly : Keep your flour in a cool, dry place—maybe in an airtight container—to avoid weevils.
-
Chill : Did you know chilling your dough can intensify flavors? The same goes for letting that filling set perfectly!
Satisfy Your Sweet Tooth with Baked Kit Kat Bars
Once you've gathered all these stellar ingredients and ensured you’ve got the right tools on hand, you’ll be well on your way to baking magic.
These baked kit kat bars are seriously divine. imagine biting into layers of creamy, rich chocolate and that delightful crunch—talk about a satisfying sweet tooth moment!
You could easily adapt these bars into a lunchtime treat or a sweet snack idea for a movie night. plus, let’s be real—nothing says “i love you” quite like a plate of crispy chocolate bars .
With the holidays right around the corner, these bars can also make for terrific party dessert ideas ! just picture it: a cozy gathering with friends, a tray of these deliciously layered chocolate treats, and everyone sharing how much they love these crunchy dessert bites .
Ready to tackle the next section? We’ll dive into the step-by-step instructions in the upcoming part of our chocolate-baking journey. Who’s excited? I know I am!
The Ultimate Guide to Creating Baked Kit Kat Bars
Oh my gosh, have you ever experienced the magic of a homemade chocolate bar? it’s like getting a warm hug from your oven! today, i want to share my beloved recipe for baked kit kat bars , a delicious twist on the classic treat we all know and love.
Whether you're planning a party or just wanting to satisfy that relentless sweet tooth, these bars are super easy to whip up and come with a delightful, crunchy texture that will make you swoon.
Let’s dive right into this adventure, shall we?
Essential Preparation Steps
Before we start baking, let's chat about mise en place —yep, that fancy french term just means having everything in its place! gather your ingredients: all-purpose flour, powdered sugar, butter, an egg, vanilla extract, salt, your beloved kit kat bars, heavy cream, granulated sugar, and semi-sweet chocolate chips.
Having everything prepped will make your life a whole lot easier.
Prep Techniques
- Preheat your oven to 350°F (175°C) . Now, that’s the sweet spot for baking these bars!
- Grab a 9x9-inch baking dish and either grease it or line it with parchment paper. This helps in easy removal later.
Time Management
You’ll need about 15 minutes of active prep, plus 30 minutes of chilling time and 20 minutes of bake time.
So, all in all, plan for just over an hour to create these crunchy chocolate wonders!
Organization Tips
As you prep, organize ingredients by order of use. trust me, it’ll save you time and keep the chaos at bay.
Set up your work station with utensils and bowls to keep everything in check when you’re rolling through the recipe.
Professional Cooking Method
Okay, let’s get into the nitty-gritty of how to make these
Baked Kit Kat Bars . Follow along, and let’s make some magic!
- In a mixing bowl, blend 1 ½ cups flour , ½ cup powdered sugar , and ½ tsp salt .
- Pour in ½ cup melted butter , 1 large egg , and 1 tsp vanilla extract , and mix it all together until smooth. The dough should be somewhat thick—this is what will give you that crunchy chocolate base!
- Press this mixture evenly into the bottom of your prepared dish and pop it in the oven for 15 minutes until it's lightly golden. You want it baked but not dry, so check for that golden glow!
Temperature Control
Keep an eye on that oven. If your crust is browning too quickly, reduce the temperature slightly. We want perfectly baked joy, not burnt sadness!
Timing Precision
Once your crust is out of the oven, let it cool slightly—maybe 5 minutes will do. Meanwhile, let’s prepare the filling.
- In a saucepan, heat ⅓ cup heavy cream and ¼ cup granulated sugar until it’s simmering.
- Remove it from the heat and stir in 4 chopped Kit Kat bars until they're melted into a smooth mixture. Heaven in a saucepan, I tell you!
Expert Techniques
Now for assembling magic! Pour the smooth chocolate filling over the crust and spread evenly.
Next, let's top off our delicious creation. In a separate bowl, combine ½ cup semi-sweet chocolate chips with 1 tbsp vegetable oil . Melt them together and drizzle over your bars.
Success Strategies
Before you dive in to cut them, this is really important: chill your bars in the fridge for 30 minutes . Chilling will help the layers firm up and set perfectly.
Troubleshooting Tips
If your bars seem too gooey after chilling, give them a little more time in the fridge. however, if they’ve set too hard, they might need a warm-up.
Just leave them out for a few minutes before cutting.
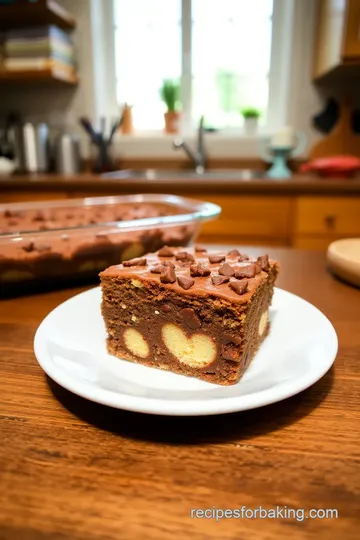
A Sweet Finish
When you're ready, slice those beauties into about 12 bars . honestly, you just made baked chocolate treats worthy of a party, a potluck, or just a netflix binge session (no judgment here!).
If you want to jazz them up, serve with vanilla ice cream, or maybe some fresh berries for a pop of color.
Trust me; your friends will think you’re a baking wizard!
Now that you've got the skinny on these scrumptious bars, let’s transition to some additional information that will help you tweak this recipe even further and explore creative variations.
I can’t wait to share some fun ideas!
Master Chef's Advice
Oh, my goodness, if you’re diving into the world of baked kit kat bars , you’re in for a treat! when i first attempted this, i thought, “how hard can it be?” well, i learned that pulling off indulgent dessert recipes like these requires a smidge of finesse.
Professional chefs often say, “don’t be afraid to use your instincts!” so get comfy in your kitchen and let those baking techniques for beginners flow.
You see, there are just a couple of expert techniques that really help. first, temperature matters ! keeping an eye on your baking time can turn your bars from good to downright fabulous.
And, as they say, “a messy kitchen means a happy cook!” embrace the chaos; it’s part of the magic.
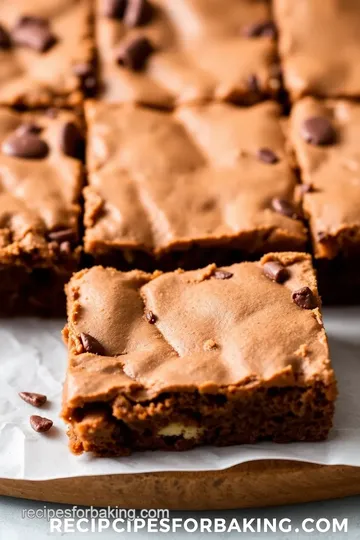
Perfect Presentation
Now, let’s talk visuals. presentation can make or break your party dessert ideas . imagine pulling those beautiful crunchy chocolate bars from the fridge and displaying them on a delightful platter! when plating, i always suggest cutting them into perfect squares .
It sounds minute, but trust me: uniformity is your friend.
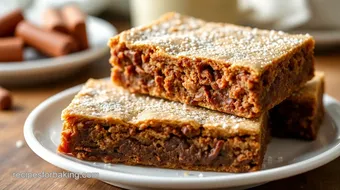
For garnish, think simple yet effective. crushed hazelnuts or a drizzle of melted chocolate takes it from “meh” to wow ! you can even add a sprig of mint for a pop of color.
It’s like dressing your dessert in its best clothes – and who doesn’t love a good outfit?
Storage and Make-Ahead
One of the best parts about these baked chocolate treats is how they store. to keep them fresh, wrap them tightly in plastic wrap, and they’ll last a week in the fridge (if they even make it that long!).
If you want to get ahead of the game, these bars are a fantastic make-ahead dessert. just remember to chill them thoroughly after baking, as the flavors deepen with a bit of time.
Reheating? A quick zap in the microwave for about 10 seconds will bring back that gooey center without losing the crunch.
Creative Variations
Now, let your imagination run wild! ever thought about adding a twist? you can try different flavor adaptations by swapping chocolate types or even throwing in a layer of caramel.
For those watching their carbs, make room for gluten-free baking substitutes . almond flour works like a charm!
And let’s not forget seasonal variations – think pumpkin spice for fall or peppermint for the holidays. Imagine the delight on your friends' faces when they bite into a chocolate wafer bar that tastes like Christmas!
Complete Nutrition Guide
So, here’s the scoop: if you’re indulging in these chocolate dessert bars , it helps to know what you’re putting in your body.
Each bar roughly has about 190 calories, so they are rich but oh-so-satisfying. the chocolate not only makes your taste buds sing but also offers a bit of joy in each bite, thanks to the antioxidants.
Portion control is key though – I mean, who can stop at one, right? But if they’re cut into even-sized squares, that helps keep track.
Expert FAQ Solutions
Now, i’ve been in your shoes, and i know the kitchen has its surprises. “what if my filling doesn’t melt?” panic not! just reheat it on low; patience is your secret ingredient.
And if your bars turn out crumbly, you might have over-baked them. next round, keep an eye on that oven!
The good news is there’s always a way to fix things along the way. like, adding more chocolate chips can save the day on a short notice! and never forget – when it comes to baking, practice makes perfect.
Your friends will soon applaud your efforts!
So, there you have it! making baked kit kat bars at home isn’t just about throwing ingredients together; it’s a journey.
Share these treats with family, take them to parties, or keep them all to yourself (i won’t judge!). remember, baking is meant to be fun, so don’t stress too much.
Embrace the sweet chaos and enjoy every edible moment of your baking adventures!
Baked Kit Kat Bars Card
⚖️ Ingredients:
- 1 ½ cups (180g) all-purpose flour
- ½ cup (50g) powdered sugar
- ½ cup (113g) unsalted butter, melted
- 1 large egg
- 1 tsp (5ml) vanilla extract
- ½ tsp (2g) salt
- 4 Kit Kat bars, chopped
- ⅓ cup (80ml) heavy cream
- ¼ cup (50g) granulated sugar
- ½ cup (90g) semi-sweet chocolate chips
- 1 tbsp (15ml) vegetable oil
🥄 Instructions:
- Step 1: Preheat your oven to 350°F (175°C).
- Step 2: Prepare the baking dish by greasing it or lining it with parchment paper.
- Step 3: In a mixing bowl, combine flour, powdered sugar, and salt.
- Step 4: Add melted butter, egg, and vanilla; blend until smooth.
- Step 5: Press the mixture evenly into the bottom of the baking dish.
- Step 6: Bake for 15 minutes or until lightly golden.
- Step 7: Remove from the oven and let it cool slightly.
- Step 8: In a saucepan, heat cream and sugar until simmering.
- Step 9: Remove from heat; stir in the chopped Kit Kat bars until melted and smooth.
- Step 10: Pour the filling over the crust and spread evenly.
- Step 11: In a separate bowl, combine chocolate chips and vegetable oil; melt together until smooth.
- Step 12: Drizzle over the top of the filled bars.
- Step 13: Refrigerate for at least 30 minutes to set.
- Step 14: Once set, cut into bars and enjoy!
Previous Recipe: Apple Pie Filling Baked Beans: The Best Sweet & Savory Delight!
Next Recipe: Baked Mucver: 5 Delicious Turkey Zucchini Fritters You Must Try!