Classic White Bread Recipe
Learn to bake classic white bread that's soft and delicious like my grandma used to make! This recipe brings warm memories to your kitchen. Give it a try!

The Warm Embrace of Freshly Baked Bread
Have you ever walked into a kitchen where someone’s just pulled a loaf of bread from the oven? oh my gosh, the smell ! it wraps around you like a cozy blanket on a chilly evening.
I still remember the first time i tried to bake bread myself. honestly, i was a bit nervous. i mean, just the thought of baking classic white bread | soft & delicious made me feel a mix of excitement and the slightest bit of fear.
But, i was determined to recreate that warm, inviting atmosphere right at home.
Why You Should Try Baking Bread
Let’s take a little journey back in time. baking bread is one of the oldest culinary traditions, with roots stretching across different cultures.
Ancient egyptians perfected their methods, while this classic bread recipe evolved through the ages. today, homemade white bread is more than just a staple; it’s a comforting food that connects generations.
Everyone seems to appreciate that soft white loaf, whether it’s for sandwiches or just enjoyed warm with butter.
So, here’s the lowdown: it’s easy bread making ! you’re looking at about 15 minutes of active prep time and then a bit of waiting while the dough rises.
In total, you’re looking at around two hours and 45 minutes before that beautiful loaf is ready to slice. yep, you can totally tackle this journey, even if you’re a novice in the kitchen.
The Magic of Homemade Bread
Now, let’s chat about some of the key benefits of baking your own bread. first, there’s something incredibly satisfying about turning simple ingredients into a heavenly loaf.
Whipping up a yeast bread recipe not only fills your kitchen with delightful scents but also gives you control over ingredients.
This means you can avoid unnecessary preservatives found in store-bought versions. plus, who doesn’t love that fresh, warm bread texture?
Did you know that the nutritional benefits of making your own bread can be pretty impressive? homemade white bread can be tailored to your preferences.
You can amp up the fiber by adding whole grain elements or even mix in some seeds for added crunch.
And let’s be honest—there’s nothing quite like the deliciousness of fresh bread , right? whether it’s served at family dinners or featured at your next gathering, fresh loaf simply elevates any meal.
Perfect for Every Occasion
You want to know the best part? this bread fits perfectly into any occasion. weekend brunch? serve it with a homemade spread! holiday dinners? use it for that fantastic roasted turkey sandwich.
I mean, who doesn’t love a good sandwich? it’s versatile as heck and is sure to become a staple at your table.
Now, if you’re convinced and excited to start your own bread loaf making adventure, let’s get to the good stuff! we'll dive right into the white bread ingredients you’ll need.
Trust me; once you start enjoying that warm slice of homemade goodness, you'll never want to go back to store-bought!
So, grab your apron and let’s bake some bread. Up next, we’ll tackle the list of ingredients and get started on our step-by-step bread baking journey!
The Essential Ingredients Guide to Baking Classic White Bread
Let’s get real here. baking your own bread is like inviting a warm hug to your kitchen. oh my gosh, nothing beats the aroma of fresh bread wafting through the house! whether you’re a seasoned pro or just dipping your toes into the world of homemade white bread, knowing the essential ingredients is half the battle.
So, grab a cup of coffee, and let’s dive into this delicious journey together!
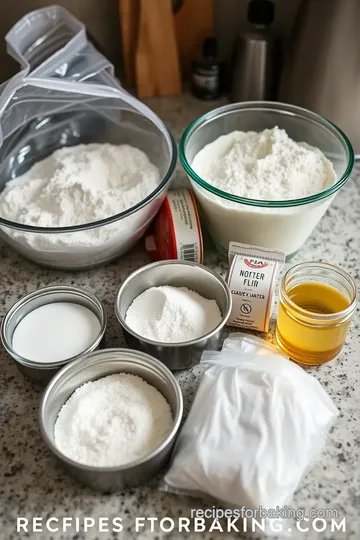
Premium Core Components
First off, let’s break down the basics. Here’s what you need to Bake Classic White Bread | Soft & Delicious without any hiccups.
- All-Purpose Flour: You’re gonna need about 4 cups (480g) . Look for flour that's soft and fresh because it greatly impacts your loaf’s tender bread texture.
- Instant Yeast: A must! Use 2 teaspoons (7g) . Choose a brand that’s been stored correctly and fresh; this is your loaf’s secret weapon for that fluffy bread loaf.
- Sugar: You only need 2 tablespoons (30g) . But hey, go for granulated sugar—it feeds the yeast and helps with browning.
- Salt: Sounds simple, huh? But 1 tablespoon (15g) is key to balancing flavors. Choose a good quality one!
- Warm Water: Grab 1 ½ cups (360ml) , heated to about 110° F ( 43° C) . Too hot? You’ll kill your yeast. Too cold? It won’t activate. You gotta find that sweet spot!
- Butter: A luxurious 2 tablespoons (30g) melted butter makes everything better! If you’re feeling adventurous, olive oil can be a great substitute.
Freshness Tips and Selection Criteria
So, how do you know if your white bread ingredients are fresh? check expiration dates, and give that flour a sniff.
If it smells stale or “off,” it’s time to toss it. store your ingredients in a cool, dry place and keep them sealed—this practice can extend their shelf life.
Signature Seasoning Blend
Now, let’s spice things up! While classic white bread is simple, you can add heart and soul with some seasonings.
- Herbs: Fresh or dried, they can elevate your bread! Rosemary or thyme works wonders.
- Flavor enhancers: Think garlic powder or onion powder. These little guys can pack a punch!
Want to spice things up? You could totally play around with cheeses and other aromatics. A touch of garlic is like a surprise party in your bread!
Smart Substitutions
Not every recipe requires a trip to the store. Here are some common alternatives you might have on hand.
- Flour: If you’re out of all-purpose, try blending with whole wheat or even almond flour for a different twist.
- Butter: Got coconut oil instead? Perfect! Just use the same volume.
If you're crunched for time, the no-knead bread technique can save the day. Mix it up, let it rise, and on your way to a delicious sandwich bread !
Kitchen Equipment Essentials
Before you grab that apron, let’s make sure you’re set up with the right tools.
- A good mixing bowl and loaf pan are non-negotiables.
- A wooden spoon or spatula for mixing is dandy.
- A clean kitchen towel or plastic wrap keeps your dough from drying out during rises.
Honestly, a simple baking sheet can work if you don’t have a loaf pan. Just form your dough into a free-form loaf, and you’re good to go!
Wrapping Up and Transition to Instructions
Are you as excited as i am? now that we’re armed with the right ingredients and equipment, it’s time to roll up our sleeves and dive into the step-by-step process.
From mixing and kneading to letting that dough rise, it’s all about using your hands and a little bit of love.
Just remember, the journey to that soft white loaf is not just about the end product; it’s about enjoying the experience of baking.
So, let’s bake classic white bread | soft & delicious together!
Your kitchen is about to become the coziest place on earth!
Baking Basics: Master the Art of Professional Cooking
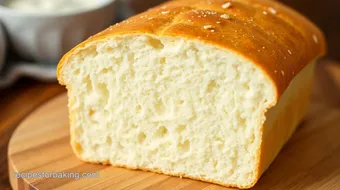
When it comes to baking bread at home , we all want that soft white loaf that melts in your mouth, right? it's like a warm hug in food form.
If you're looking to bake classic white bread | soft & delicious , understanding some professional cooking methods can take your loaves to the next level.
Let's dive into the nitty-gritty of bread making!
Essential Preparation Steps
Before you even touch that flour, let’s talk about mis en place —it sounds fancy but trust me, it’s just french for “everything in its place.
” gather your white bread ingredients : flour, yeast, sugar, salt, butter, and warm water. yeah, it’s simple! having everything ready saves you from those frantic “where did i put the yeast?” moments.
Time management is another biggie. bread making is a bit of a waiting game with the rising, but it’s totally worth it.
Want perfection? keep your eye on the clock. you’ll need about 1 hour for the first rise and 30- 45 minutes for the second.
And don’t forget safety considerations ! keep that workspace clean, especially if you're working with yeast. wash your hands before you start.
It’s basic stuff but trust me, you don’t want to think about the last time you touched raw meat while kneading your dough!
Step-by-Step Process
Alright, let’s break this down:
- Combine dry ingredients: Whisk those bad boys together in a large bowl.
- Mix wet ingredients in: Add your warm water (about 110° F/ 43° C) and butter to the flour mixture. Stir it until it all comes together—no one wants a dry loaf!
- Knead the dough: This is where the magic happens. About 8- 10 minutes of kneading will do the trick. You want your dough to look smooth and elastic.
- First rise: Pop it in a greased bowl, cover it, and let it sit in a warm spot. You’re looking for it to double in size.
- Shape and second rise: Punch it down, shape it into a loaf, and let it rise again for about 30- 45 minutes .
- Bake it: Preheat your oven to 375° F ( 190° C) , then let it bake for 30- 35 minutes until it's all golden brown. Your whole house will smell amazing!
Expert Techniques
Okay, here’s where we tune up your bread game. one critical step? temperature control points ! ensure your water isn't too hot or it will kill the yeast—opps! aim for that cozy 110° f ( 43° c) temperature.
Keep an eye on timing precision too. Each rise matters! If you're new, look for visual cues for doneness : the bread should be golden and sound hollow when tapped.
Troubleshooting tips ? if your dough doesn’t rise, check that your yeast is alive. a quick test is to put a little in warm water and see if it bubbles up.
If it doesn’t, time to buy a new packet!
Success Strategies
Don’t you hate it when things go wrong? Here’s how to avoid some common mistakes. First off, do not skip the kneading —seriously, that’s the backbone of a good texture.
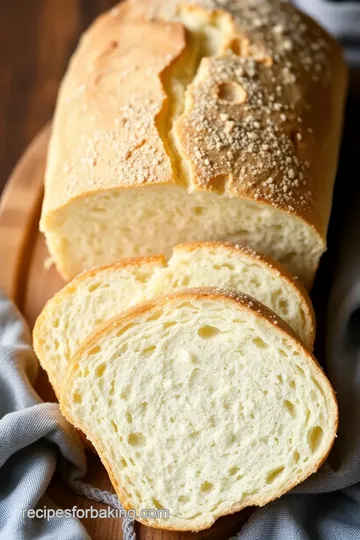
For quality assurance , slice a bit of your loaf to check the texture. It should be soft and fluffy, with that tender crumb we all love.
And if you’re planning ahead, don’t worry! this recipe has make-ahead options . you can let the dough rise and then stick it in the fridge for a day.
It’ll develop an even better flavor.
So, if you’re up for a challenge, grab those basic bread ingredients and give it a whirl!
Now that you're on your way to perfecting that artisan white bread , let’s chat about some additional information that might help elevate your baking game even further!
Additional Recipe Information for Bake Classic White Bread | Soft & Delicious
Let’s dive a little deeper into the world of baking and share some pro tips, presentation ideas, storage tricks, and creative variations.
Honestly, baking your own bread at home is like a warm hug for your taste buds. you’ve got this!
Pro Tips & Secrets
Chef’s personal insights: every baker has their little secrets. to kick things off, always trust your senses. the dough should feel soft and elastic, not sticky.
And, if it’s your first time, don’t stress about getting it perfect. practice makes, well, makes the best bread!
Time-saving techniques: use instant yeast instead of active dry yeast. it saves a ton of time since you can mix it right in with the flour.
Plus, you can even skip the initial proofing if you’re feeling adventurous!
Flavor enhancement tips: for a subtle flavor boost, try adding a teaspoon of garlic powder or a pinch of herbs into the dough.
You could even toss in a splash of honey for sweetness. trust me, it changes the game!
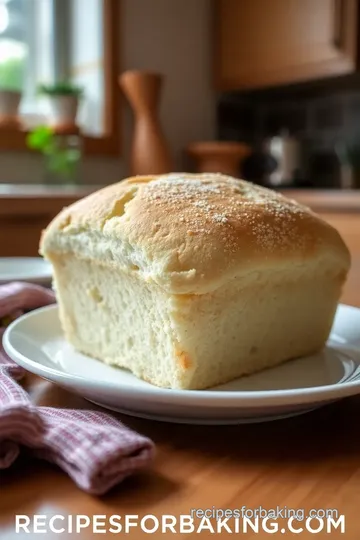
Presentation advice: when it comes to serving your loaf, presentation is key! slice it evenly and fan out the pieces on a rustic wooden board.
A light dusting of flour on top gives it that artisan vibe, and you’ll be serving up slices that look as good as they taste.
Perfect Presentation
Now, let’s talk about how to make that loaf of yours look stunning!
Plating Techniques: You don’t need fancy plates. A simple, clean-cut appearance is best. Arrange the slices with a small bowl of butter on the side. It’s classic and inviting.
Garnish Ideas: Fresh herbs like rosemary or thyme, lightly brushed with olive oil, make for a stunning garnish. Scatter some over the bread just before serving to add that pop of color.
Color Combinations: Serve your bread alongside some vibrant sides like a fresh salad or a bright soup. The contrast makes everything more inviting.
Visual Appeal Tips: A little drizzling of olive oil or balsamic vinegar can add shiny elegance. A fresh sprig of parsley or basil doesn’t hurt either!
Storage & Make-Ahead
Storage Guidelines: Homemade bread is best enjoyed fresh, but we both know life gets busy. Wrap your loaf in plastic wrap or keep it in an airtight container at room temperature.
Preservation methods: you can freeze your bread too! slice it first, so you can pull out just what you need.
Wrap slices tightly in plastic wrap, and then pop them in a freezer bag. great for those "i need carbs now!" moments.
Reheating Instructions: When you’re ready to devour those slices, pop them in the toaster or microwave for just a few seconds to regain some of that soft, fluffy texture.
Freshness Duration: Generally speaking, your homemade white bread will stay fresh for about 3-5 days at room temperature, and can last up to three months in the freezer.
Creative Variations
Time to get creative with your bread!
Flavor Adaptations: Swap out plain white flour for whole wheat or spelt for a different twist. Or add in some dried fruits or nuts for a sweet surprise inside.
Dietary Modifications: For a gluten-free option, use gluten-free flour blends available at the store. Keep in mind; the texture may vary slightly but you’ll still get a delicious result.
Seasonal Twists: Around the holidays, consider adding spices like cinnamon or nutmeg to the dough. It’ll fill your kitchen with such a cozy aroma!
Regional Variations: You could experiment with herbed focaccia or a French-style baguette . This classic bread recipe can be a canvas for so many flavors!
Complete Nutrition Guide
Curious about what you’re whipping up? Here’s a quick breakdown:
Detailed Breakdown: Homemade white bread typically contains around 120 calories per slice. So, it’s not just delicious; it’s a comforting treat that you can enjoy without too much guilt.
Health Benefits: Bread provides carbs, which means energy! Plus, homemade bread is free from preservatives. Your body deserves only the freshest!
Dietary Considerations: Remember, moderation is key! Pair your slices with proteins or healthy fats to keep your meals balanced.
Portion Guidance: A good rule of thumb is one slice for a snack and two for a sandwich. Keep it reasonable!
Expert FAQ Solutions
Got questions? Totally normal! Here are answers to some common queries:
Common Questions: “What's the best way to know if my bread is done?” Tap the bottom of the loaf; it should sound hollow!
Troubleshooting Guide: If your bread didn’t rise well, your yeast might’ve been expired. Always check those dates!
Success Tips: Measure your ingredients accurately—use weight instead of volume when you can for the best consistency.
Variations Explained: Feel free to mix and match ingredients to suit your taste. That’s the beauty of easy bread making !
Conclusion
Baking your own bread can feel intimidating at first, but trust me, it's all about having fun in the kitchen.
Whether you’re looking for that perfect slice of soft white loaf or experimenting with your own variations, you’re going to love the process.
So, roll up your sleeves and bake classic white bread | soft & delicious . you’ve got this! happy baking!
Classic White Bread Recipe Card
⚖️ Ingredients:
- 4 cups all-purpose flour (480g), plus extra for dusting
- 2 teaspoons instant yeast (7g)
- 2 tablespoons granulated sugar (30g)
- 1 tablespoon salt (15g)
- 1 ½ cups warm water (110°F/43°C) (360ml)
- 2 tablespoons unsalted butter, melted (30g)
🥄 Instructions:
- Step 1: In a large bowl, whisk together flour, yeast, sugar, and salt.
- Step 2: Add warm water and melted butter to the dry ingredients. Stir until a rough dough forms.
- Step 3: Turn the dough onto a floured surface and knead for about 8-10 minutes until smooth and elastic.
- Step 4: Place the dough in a greased bowl, cover with a towel, and let rise in a warm place for about 1 hour or until doubled in size.
- Step 5: Punch down the risen dough, then shape it into a loaf. Tuck ends under and place in greased loaf pan.
- Step 6: Cover the pan with a towel and allow the dough to rise for 30-45 minutes until it rises over the top of the pan.
- Step 7: Preheat your oven to 375°F (190°C).
- Step 8: Bake in the preheated oven for 30-35 minutes, or until the bread is golden brown and sounds hollow when tapped.
- Step 9: Remove from the pan and let cool on a wire rack before slicing.
Previous Recipe: How to Bake Chewy Lorac Cookies - Delicious Treats for Everyone
Next Recipe: How to Cook Quick Taco Soup in Under 30 Minutes: Hearty and Delicious!